One of the few tools that I consider truly indispensable when developing
websites is JSLint. I love it. It makes my life as a webdev simpler
and less prone to idiotic mistakes. Hitting the website to check changes
to my scripts is, however, a huge pain in the ass. Hence, this project.
JSLint Utils is a set of utility scripts that wrap JSLint/Rhino,
enabling linting on the command line, and automated reporting of
linting errors via a continuous integration system like Hudson.
Usage: CLI
With Node.js (recommended) or Rhino installed, you can
lint a specific JavaScript file or stylesheet from the command line by running:
/path/to/run-jslint.sh [FILE TO LINT]
If the file is clean, the script will output on stdout:
jslint: No problems found in good.js
If not, you’ll get a list of errors on stderr, and an return code
of 1:
[error.js] Lint at line 1 character 1: 'x' is not defined.
x = "is not defined";
Usage: Hudson
Integration with CI systems like Hudson generally takes place via make
files and XML dumps. In short, you’ll write a make file that lints
all the files you care about, and dumps the results in a specific XML
format into a directory. Hudson reads through the test results in that
directory, and generates reports based on success or failure.
Before generating any test results, you’ll need to specify the basename
to be used for the reporting. It makes good sense to follow the JUnit
methodology here by using a reversed domain name as your package name.
Edit line 12 of jslint-to-xml.sh to specify your basename:
TEST_BASENAME="org.mikewest.static"
With that configuration out of the way, you can generate an XML report
manually by running:
/path/to/jslint-to-xml.sh [FILE TO LINT] [REPORT DIRECTORY]
The file specified as the script’s first argument will be linted, and a
report will be generated in the directory specified as the second argument.
Running against multiple files at once is generally best done via find.
Take a look at the project’s Makefile for how I’d suggest that
best be done. Make sure you configure the source and reporting directories
by changing the relevant lines of the file, and it should Just Work™.
Hudson Configuration
In your Hudson project, you’ll need to do a tiny bit of configuration work
in order to get linting running on an automated basis. Assuming you’ve
already put a project together, you’ll need to do a few things:
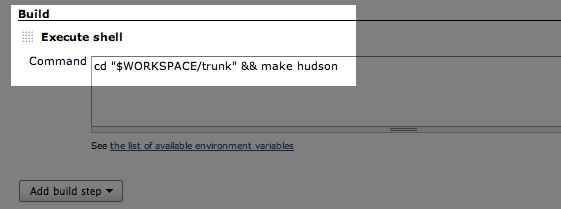
Add a new build step that runs make hudson in the source directory
of your static assets. You’ll find this in the “Build” panel of the
project configuration.
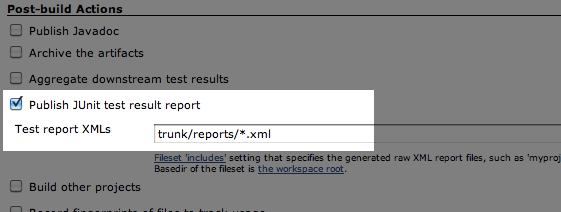
Instruct Hudson to look for JUnit-style test reports by checking the
“Publish JUnit test report result” box in “Post-build Actions”, and
entering the report directory you’ve configured in the Makefile.
Commit something, and watch while Hudson does it’s thing.
Pat yourself on the back for a job well done.
Changelog
v1.6 (2011-05-06):
Crockford changed the jslint filename; reported and fixed by adamhope
in GH-3.
v1.5 (2011-02-06):
Fixing handling of spaces in filenames and paths. Reported and fixed by
hearsaydev in GH-1.
v1.4 (2010-10-17):
Improved inline documentation, and ran the script files through Rocco
to generate run-jslint.html and jslint-to-xml.html. These
now live in the project’s docs directory.
v1.3 (2010-10-03):
Added the ability to opt into my fork of jslint, which
fixes a few behaviors that I see as bugs. Just type make fork
in the /lib/vendor directory to pull down the latest version
of my fork, and rebuild the node/Rhino bridges.
v1.2 (2010-10-02):
Added support for Node.js as an alternative to
Rhino. It’s astounding how much faster things go when you don’t have to load
Java on every execution.
v1.1 (2010-09-30):
Cleared up the project’s licensing. BSD, all the way.